【Tutorial & Setting up】Bitcoin Miner Antminer S5 1TH Asic Miner 1150GH Super Btc Miner Better Than Dragon Miner and Antminer S4

{UPDATE}
This blog had moved to our official site: WWW.EASTSHORE.XYZ Check our official site for the newest bitcoin miner, the most updated tutorial and amazing support!{Miner Specifics}
- Brand: Antminer S5
- Hash rate: 1150 GH/s (1.15 TH/s) ± 5%
- Power consumption: 590w
- Chips: 28nm BM1384
- PSU: NO PSU. NEED a PSU >= 750w with 6pin x 2 (12V DC >= 60A) (Very Important: please make sure your PSU is powerful enough. The 12V DC of your PSU is the higher ampere the better.)
{Official Manual}
You can also get the official manual here (For network setting, firmware upgrade etc., please check out the manual): https://drive.google.com/file/d/0B-_jcpU1s5dgYzlqMnFuOUdNdWc/view?usp=sharing{Before Start}
- Please prepare a ATX PSU ( >=750w and with 6pin x 2)
- Connect the miner to the router by internet cord.
- For the miner configuration, please use the ethernet cord to connect the miner to the same router which your PC also connected. (Your PC is just needed for miner configuration)
{PSU NEEDED}
- Please prepare a ATX PSU ( >=750w; with 6pin x 2)
- Please make sure your PSU is powerful enough; 12V DC is above 60A is very great! check out this PSU: http://www.aliexpress.com/store/product/Bitcoin-Miner-Use-750W-PSU-Power-Supply-with-6pin-x-4/1035615_32266273226.html
{Setting Up the PSU}
If you also bought the mining PSU in our store, please skip this section andhave a look at the section {PSU Connection} below.
- Suppose you use an ATX Computer Power Supply as your mining PSU.
- You will need 1 jumper wire. On the PSU’s 24pin motherboard power cable, you have to cross the “Green” line and the “Black” line. (The PSU has a computer inside and it communicates with the motherboard. For this setup, there is no computer motherboard to connect to, so, we have to make the PSU think it’s connected to the motherboard and the PCI and PCI-Express ports are needing the +12 V power.


{PSU Connection}
If you don't buy the PSU in our store, please skip this section.(And, if you bought another kind of PSU with no the little green connection board, please skip this section too. You can just connect the power cord of the PSU and use it.)
If you buy the PSU (with a little green connection board) in our store, you need to connect it before you use. Here is the guide:
- Check out the PSU in the package.

- There is a connection board in the package.

- Connect the connection board to the PSU.

- Then connect the 6pin cords. (You only need 2 x 6pin to connect the miner. )

- All stuff connected should be like this.

- Connect the power cord.

- All connection was done.


{Miner Connection}
- There are four 6pin connectors in 2 rows. But actually, you need only 2 of them.
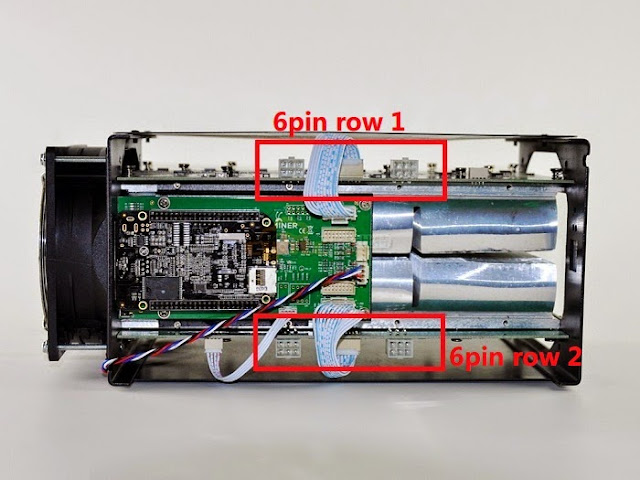
- We strongly suggest you connect the PSU via the two connectors far away from the little green board (the controller). See the following picture (you should use the connectors inside the red circle):

- The most important thing is: Please plug each of the 6pin cords of your PSU into a 6pin port in each row (Don't plug into ports in the same row, or the mining will never start...).


{Configuration IP}
- Please use an IP scanner to scan the configuration IP of your miner.
- Download the IP scan software: http://www.advanced-ip-scanner.com/
- Make sure your network, including IP of your router, your PC, are all in the IP section 192.168.1.xx (or, you need to change the IP of your router to 192.168.1.1)
- Connect the miner to the router via ethernet cord.
- Power on the miner, and wait for about 1~3 minutes (the miner need time to connect itself to the router).
- Open the IP scanning software, set the scan range as "192.168.1.1 - 192.168.1.254".
- Click button "Scan".
- Then you can find out the IP of the miner.
- The following picture showing a scanning result of a miner. The IP of this miner is "192.168.1.16". There is no this device (at "192.168.1.16") before I connect my miner to my network.
- You can also try every IP address if you are not very sure which IP is the miner.
- If you can't scan out the IP, that's must because the IP of the miner has occupied by other devices in your network, please try to pull out other devices from your network and try again.

- Sometimes, it is also shown as "Texas Instruments, Inc", as the following picture showing:

- Whatever it showed as, you can just click the little triangle before the IP to see what the device is. For Antminer, it will show as "antminer Configuration" (like the following picture showing).


{MINING GUIDE}
- Connect all the cords and ethernet cord.
- Power on the PSU.
- Wait for about 1~3 minutes (the miner need time to connect itself to the router).
- Scan the ip of the miner. (For how to scan, see the section {configuration IP} above)
- Now, we can configure the miner now.
- Login the configuration page via the configuration ip you scanned (eg. 192.168.1.16). The default username is "root" and password is "root" too, and then click "Login".

- In the "Miner Configuration", configure your mining pool address, mining account, miner password etc. And click "Save & Apply".

- Wait for about 1~2 minutes.(ps: while you are waiting, you'd better not to click anything)
- Then mining is starting... You can check the mining status in the "Miner Status" page. (ps: sometimes, the page may show no any data, it just occur sometimes, however, in that situation, please just power off your miner, and then power on it again.)

- The mining will start automatically when power on after you configure it.
- If the network setting works well for you, you'd better not to change any network settings.


{NOTE: Miner not start mining}
This just happened occasionally. If your miner works very well, please skip this section.If your miner can't start normally. please try to:
- check if all the cords on the miner are inserted tightly. (We pack the products very carefully, but cords on the miner might fall out during the delivery. However, it just happened occasionally.)
- Just try to power off the miner and wait for some seconds, and start it again.
- Try to reset the miner via the reset hole: on the miner. You will find a reset hole beside the ethernet (the red circle is the reset hole), after you power on the miner, wait for 2 minutes, then please got a pin and press the hole for some seconds until the miner beep. Then wait for 1~5 minutes for the resetting. While resetting, the miner may be beeping for some seconds. Then the miner will start automatically, the fan of the miner will start running louder. Then, please use the ip scanning software to scan the ip of the miner again. (See section {Configuration IP} for how to scan the ip)

- Try to Upgrade the firmware. (see the Official Manual for how to upgrade firmware)
- The following is also suggested: take out the screws on the controller (the little green board with the black pi on the top of the miner), and lift the controller up, see if the miner works normally. If it does, then it suggests that the needle below the controller is too long so it touches the metal holder and affect the signal transmission of the controller.
- Try to rewrite the image for the miner, check out here: http://eastshoretrade.blogspot.com/2015/04/tutorial-setting-uphow-to-re-image.html
- If you have more than one miner, please try to replace the controller of the un-mining miner. For how to replace, please see the section {Replace the Controller} below.
- If all the method above are not work, and if you have more than one miner, please try to make clearly which parts of the bad miner is broken, do like this: replace the controller, the fan, the 2 blades of the bad miner by the part from the good miner one by one, to see which part of the miner is damaged (if you replaced one part of the bad miner then the miner running, then this part on the bad miner is broken). contact us for the result.

{More Cooler Miner -- Use Another Fan}
This section is only used as a guide for those who want to add another fan to the miner for the reason of heat dissipation. (You can just ignore this section)- Check out the specific of your fan. We recommend a 12V 1.5A 4pin PWM fan (size: 120*120*38mm). The following is a fan of this specific. We used in our test, it works very well.


- The fan should be added to another end of the miner where is no the ethernet port.


- Please be attention to the side of the fan you are going to add. (The side with the text mark (the specific mark) should be upward)

- And please be attention to the position of the cable of your fan. The cable be on the side where there is a "Antminer S5" mark.


- Put the protective shield on.

- Screws all the 4 screws on. (If the screw is too long, it doesn't matter, just make sure it's tight.)


- Insert the connector of your fan to the fan port on the miner.


- When you insert the fan connector, please be attention to the direction of the connector.


- Connection Done.


{Replace the Controller}
The section is only for those who want to replace the controler on the miner. You can safely skip this section.- This is the controller of the S5.

- First, plug out all the cables on the previous controller (and also the ethernet cord).

- For replacing the controller, you don't need to take off the previous controller, just place the new controller above the old one.

- Insert all the cables that you just plunged out from the old controller to the new controller you just putted on the old controller.

- Make sure all the cables insert tightly (all the cables within the red circles in the picture).

- Insert the ethernet cord.
- replace done.


{Trouble Shoot}
Q: Sometimes, there is no any data showing on the "Miner Status" page, in that case, please:A:
- Check your home network setting, is it normal?
- Check the mining pool address you setted in the "Miner Configuration", can your home network connect to the pool ?
- Set the network protocol to DHCP via Navigate to Network -> Setting.

- Upgrade the firmware. (some old version of the mining system maybe get this "no data" problem, please upgrade the firmware to the newest ones)
- Check if all the cables inside the miner are connected tightly.
- After you setted the pool address etc, and click "Save&Apply", while you wait the setting applied, please don't click anyting.
- Try to reset the miner.

Q: when you are getting "x" (or "-") on the ASIC chip status and the mining speed is very low (However, this just happened occasionally), please:
- Power off the miner, wait for some minutes, then power on it again. Check the chip status to see if the "x" (or the "-") disappeared.
- Check all the cables inside the miner to see if they are inserted tightly.
- please pay attention to the heat dissipation of the miner. Because the the chip of the miner maybe stop mining if the temperature is too high.
- If you several miners, please make sure put them far away from each other.
- Get more fan or other dissipation methods to make the miner more cooler.
- Turn off the antminer and double check your PSU cables are connected well and restart.
- Check the status in about 5 minutes and every 30 minutes for a few hours and see if the "x" are showing up constantly at the same chip or randomly changes or completely disappear.
my antminer is not going more then 750 ghs even my miner is 1155 ghs please help me
ReplyDeleteGreat post. I think it is good for visitors. I like this kind of website where has a lot of real information, It proved to be very helpful. Thanks for admin, His creativity, Presentation, Information and all is good.
ReplyDeletehome network setup
Thank you very much! : )
DeleteThank you, this is very helpful! Can you please explain where to buy a S5 controller?
ReplyDeleteHi azimuth,
DeleteYou can buy the controller from BITMAIN. And you can also ask for the seller who sold the miner to you for help.
Btw, some content of the blog may be old, you can check our official site EASTSHORETRADE.COM for the newest version of the post.
Regards,
Vanessa
Harrah's Cherokee Casino & Hotel - JSH Hub
ReplyDelete› events › 시흥 출장마사지 events Harrah's Cherokee Casino & Hotel - JSH 계룡 출장마사지 Hub - Book now with JMT's Jambi Resort! Compare hotel prices, 제주도 출장안마 see 7 photos and read 2317 reviews: "Great place for a quick bite and a drink". Jambi Casino & 강원도 출장샵 Hotel 익산 출장안마 in Cherokee,