【Tutorial & Setting up】Scrypt Miner 35MH Asic Miner A2 Terminator 28nm Litecoin Miner for Scrypt Mining Excellent as Gridseed Only 350w

- This blog had moved to our official site: WWW.EASTSHORE.XYZ
{PSU NEEDED}
- Please prepare a ATX PSU ( >= 350w and with 6pin x 2)
- Plz make sure your PSU is powerful enough;
- check out this PSU: http://www.aliexpress.com/store/product/BTC-miner-1050W-PSU-80PLUS-GOLD-1050w-Power-Supply-with-6pin-x-4/1035615_2044191767.html
{Before Start}
- Connect the miner to the router by internet cord.
- The default IP of the miner is “192.168.1.100”, so, plz make sure the IP your router is "192.168.1.xx" too(eg. 192.168.1.1).
- For miner configuration, plz use the ethernet cord to connect the miner to the same router which your PC also connected. (Your PC is just needed for miner configuration)
- We pack the products very carefully, but cords on the miner might fall out during the delivery, so, if the miner cannot start normally, please check if all the cords on the miner are properly connected and connect tightly.
- If you have several miners, please make sure put them far away from each other.
{Miner Connection}
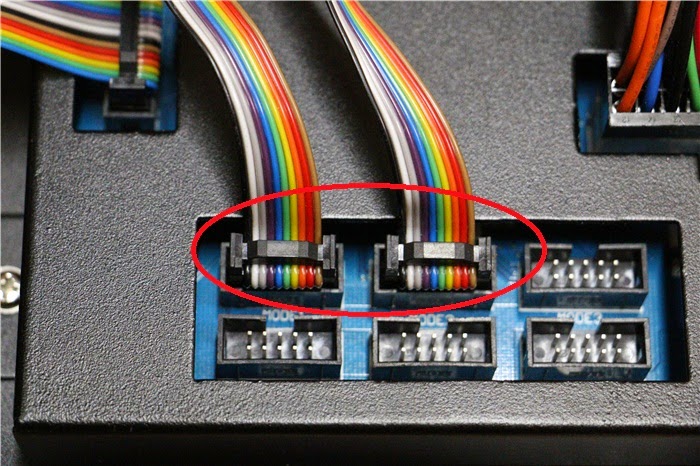
- The miner you got had already half connected, like the following picture showing:
 |
| Half Connected Miner |
- Make sure the two signal lines are inserted in the right ports and inserted tightly.
- Please insert the SD card (loaded with the mining system) to the miner. (We pack the SD card with bubble warpping and paste it on the miner like the following picture showing.)
 |
| SD card packing in the bubble warpping |
 |
| Taking out the SD card from the buble warpping |
 |
| Insert the SD card into the miner |
- Make sure other cords on the miner are connected tightly.
- Connect the your PSU to the miner via the 6pin cords of your PSU.
- Before connect the 6pin:

- After connected the 6pin:

- Connect the 24pin (or the 20+4 pin) cords of your PSU to the miner.
- before connect:
 |
| The 24pin(20 + 4 pin) of the PSU |
 |
| The 24pin connect port on the miner |
- After connected:
 |
| 24pin connected |
- Connect the internet cords.

- Miner connect OK.
{Check your network}
- Pressing the windows key + the R key. So 'Windows + R'. This should give you a small window called 'run'.
- Enter 'cmd' in the window, and hit the enter key. This should open a new window.

- Input commend "ipconfig", it will show the details of your network.
- Make sure the "Default Gateway" is "192.168.1.xx".

- If the default gateway is not "192.168.1.xx", please change to another router (which give a default gateway as "192.168.1.xx"), or, change the ip of your router to "192.168.1.xx"
- Input commend "ipconfig", it will show the details of your network.
- Make sure the "Default Gateway" is "192.168.1.xx".
- If the default gateway is not "192.168.1.xx", please change to another router (which give a default gateway as "192.168.1.xx"), or, change the ip of your router to "192.168.1.xx"
{Miner Guide}
- Connect the miner to the router by internet cord.
- The Default IP of the miner is "192.168.1.100".
- Power on your PSU.
- Open configuration page: Open IE --> input the "192.168.1.100" in the address bar.
- If IE can’t open the address you inputed, plz just try a few more times. (sometimes, the miner need about 1 minute to connect itself to the router)
- Change the configure of the miner on the configuration page. For the configuration option, see section {Configuration Page} below.
- Save the change.
- Power on the miner again.
- Just wait for about 1~3 minute, and the mining will start automatically.
- You can see the mining status on the configuration page.
- Once you configured the miner, the miner will start automatically after power on.
{Configuration Page}
The following picture showing the configuration page:

IMPORTANT
-
After you changed any of the network setting option, please click the button NETWORK SETTING CONFIRM. Then wait a minute for the network setting be valid.
- After you changed the IP address, you should power off the miner, then input the IP address you have changed(if you don’t change the option “IP ADDRESS”, just input the original ip) in the address bar and enter configuration page again.
- If the network works well for you, we don't recommend you to change it.
-
After you changed the mining setting(POOL 1 ADDR, POOL 1 ID, POOL 1 PWD etc.), plz click the circle after “CGMINER START” and then click the button “CGMINER SETTING CONFIRM”.
- After you changed the mining setting, please power off the miner, and then restart the miner again. The mining will start automatically after about 1~3 minutes. The status will be like the following picture showing.

-
If the mining does not start, plz try to click: circle after “CGMINER STOP” → button “CGMINER SETTING CONFIRM” → circle after “CGMINER START” → button “CGMINER SETTING CONFIRM”
-
If one of the pool setting is empty (not set), plz just keep it as ‘/’ (default invalid pool address and etc.)
-
BOARD SPEED : set the option “board speed” as “1200Mhz” can get a speed about 35~ 38MH/s, but please pay more attention to the heat dissipation.
-
Please just ignore the speed showing on the page, like "A2 Terminator Speed 102.3MH/s".For realtime mining status and the real mining speed, plz click “REALTIME STATUS MONITOR”, the realtime mining status showing like this:

The following picture showing the configuration page:
IMPORTANT
- After you changed any of the network setting option, please click the button NETWORK SETTING CONFIRM. Then wait a minute for the network setting be valid.
- After you changed the IP address, you should power off the miner, then input the IP address you have changed(if you don’t change the option “IP ADDRESS”, just input the original ip) in the address bar and enter configuration page again.
- If the network works well for you, we don't recommend you to change it.
- After you changed the mining setting(POOL 1 ADDR, POOL 1 ID, POOL 1 PWD etc.), plz click the circle after “CGMINER START” and then click the button “CGMINER SETTING CONFIRM”.
- After you changed the mining setting, please power off the miner, and then restart the miner again. The mining will start automatically after about 1~3 minutes. The status will be like the following picture showing.
- If the mining does not start, plz try to click: circle after “CGMINER STOP” → button “CGMINER SETTING CONFIRM” → circle after “CGMINER START” → button “CGMINER SETTING CONFIRM”
- If one of the pool setting is empty (not set), plz just keep it as ‘/’ (default invalid pool address and etc.)
- BOARD SPEED : set the option “board speed” as “1200Mhz” can get a speed about 35~ 38MH/s, but please pay more attention to the heat dissipation.
- Please just ignore the speed showing on the page, like "A2 Terminator Speed 102.3MH/s".For realtime mining status and the real mining speed, plz click “REALTIME STATUS MONITOR”, the realtime mining status showing like this:
{Speed Test}
- Frequency 1100MHz:

- frequency 1200MHz:

Comments
Post a Comment