
- This blog had moved to our official site: WWW.EASTSHORE.XYZ
{PSU NEEDED}
- Please prepare a ATX PSU ( >= 1050w and with 6pin x 4)
- Plz make sure your PSU is powerful enough;
- check out this PSU: http://www.aliexpress.com/store/product/BTC-miner-1050W-PSU-80PLUS-GOLD-1050w-Power-Supply-with-6pin-x-4/1035615_2044191767.html
{Setting Up the PSU}
Suppose you use a ATX Computer Power Supply as your mining PSU.
You will need 1 jumper wire. On the PSU’s 24pin motherboard power cable, you have to cross the “Green” line and the “Black” line.
(The PSU has a computer inside and it communicates with the motherboard. For this setup, there is no computer motherboard to connect to, so, we have to make the PSU think it’s connected to the motherboard and the PCI and PCI-Express ports are needing the +12 V power.
(The PSU has a computer inside and it communicates with the motherboard. For this setup, there is no computer motherboard to connect to, so, we have to make the PSU think it’s connected to the motherboard and the PCI and PCI-Express ports are needing the +12 V power.

{Miner Connection}
- Setting up your PSU. (see section {Setting Up the PSU} above for how to do this.)
- There are 4 6+2pin connector inside the miner. But actually, you can safely use the 6pin connector of your PSU for the connection.

- Plz connect your PSU to the miner via the 6pin cable.

- Connect the miner to the USB port of your PC via the cable we send to you.
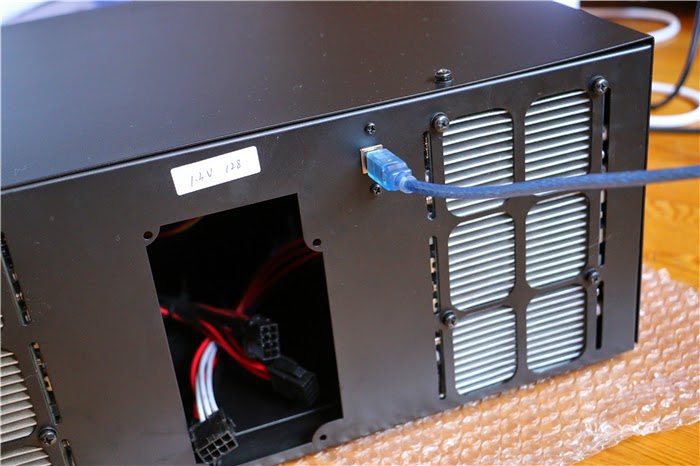
- Miner connection ok.
{MINING GUIDE -- USE Cgminer}
- Download the driver here (it's a .zip file, click "file" --> "download" to download it): https://drive.google.com/file/d/0B-_jcpU1s5dgM19oM19kYV9mX3c/edit?usp=sharing
- Unzip the driver you download and install the driver.
- For Zeusminer 28MH: Download the zeus mining software(It's a .zip file, click "file" -- > "download" to download it): https://drive.google.com/file/d/0B-_jcpU1s5dgVEduZGNleFRsSGM/view?usp=sharing
- For Zeusminer 20MH: Download mining software here: https://drive.google.com/file/d/0B-_jcpU1s5dgdlBOckd0al9SQ3M/view?usp=sharing
- Very Important: for zeusminer 20MH, plz don't use the mining software for 28MH, or your PSU will be burned.
- Connect the PSU and Power on it.(see section {Miner Connection} for how to do this.)
- Connect the miner to the USB port or your PC via the cable we send to you.
- If it shows up “setting up the driver”, please wait it to finish.
- pressing the windows key + the R key. So 'Windows + R'. This should give you a small window called 'run'.
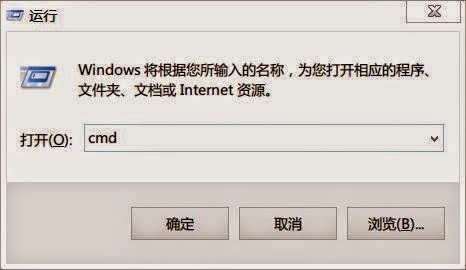
- Enter “compmgmt.msc” in the window, and hit the enter key. This should open a new window, called 'computer management'.
- Below the "COM & LPT", you can get the COM number of your miner. Please remember it. (eg. in the picture, the COM number is 5)

- Open directory "windows" in the zeus mining software you just download.
- Edit the file "run.bat": Please input the COM number you just got in the "computer management" behind the "-S //./COM". And change the mining pool, mining account, mining password to yours.
- Save and close the file.
- Double click "run.bat" and mining will start.

{MINING GUIDE -- USE Raspberry Pi}
- Connect all the cords needed for mining with Raspberry Pi.

- Power on the miner, then power on the Raspberry Pi.
- Scanning the default ip of the miner. see the section {How to use the ip scanning software} for how to use the ip scanning software.
- open IE, and input the ip you just scanning out for the miner configuration.

- Configure the mining details in the "Setting" page.

- Click "Save and Restart" to save the changes.
- Then, plz wait for some seconds, and the mining will start automatically.
- You can get the mining details in the "Status" page.

{How to use the ip scanning software}
- download the software “Advanced IP Scanner” to scan the ip. (download here: http://www.advanced-ip-scanner.com/)
- Connect the miner to the router;
- Power on the miner.
- Open the ip scanning software, following pictures showing how to scan all the ip in the section “192.168.1.1” ~ ”192.168.1.255”
- Then you can find out the ip of the miner.

Comments
Post a Comment