- This blog had moved to our official site: WWW.EASTSHORE.XYZ
{STUFF SHOWING}


.JPG)

{Before Start}
- Please prepare a ATX PSU ( >=550w and with 6pin x 2)
- Connect the miner to the router by internet cord.
- For miner configuration, plz use the ethernet cord to connect the miner to the same router which your PC also connected. (Your PC is just needed for miner configuration)
- After the miner configured, the mining will start automatically; The miner is stand alone, so you don't need your PC anymore.
{PSU NEEDED}
- Plz prepare a ATX PSU ( >=550w; with 6pin x 2)
- Plz make sure your PSU is powerful enough; 12V DC is above 45.5A is very great!
{Setting Up the PSU}
Suppose you use a ATX Computer Power Supply as your mining PSU.
You will need 1 jumper wire. On the PSU’s 24pin motherboard power cable, you have to cross the “Green” line and the “Black” line.
(The PSU has a computer inside and it communicates with the motherboard. For this setup, there is no computer motherboard to connect to, so, we have to make the PSU think it’s connected to the motherboard and the PCI and PCI-Express ports are needing the +12 V power.
(The PSU has a computer inside and it communicates with the motherboard. For this setup, there is no computer motherboard to connect to, so, we have to make the PSU think it’s connected to the motherboard and the PCI and PCI-Express ports are needing the +12 V power.

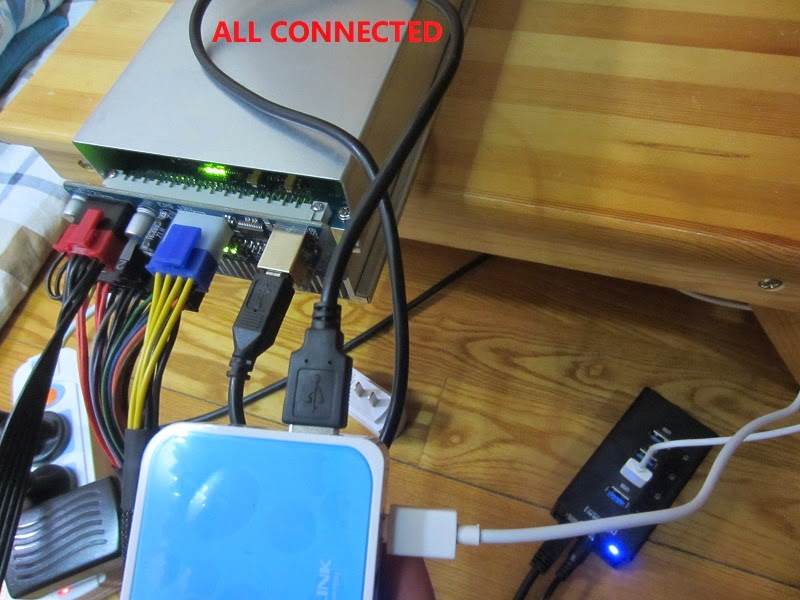
{Miner Connection}
Let’s connect those stuff
1. Connect the Connection Board to the Miner


2. Connect the PSU Cables


3. Connect the Router(function as controler) to the miner


.JPG)
{Mining Guide}
Let's start mining now, follow me:
- Connect all the stuffs (above section showing how to connect those stuffs.)
- Power on the Router(Controler) we send to you.
- Power on miner.
- Connect the Router(function as the Controler that we send to you) to your home router by a ethernet cord.
- Configure the mining wifi network and mining worker(for details, see section {Miner Configuration} below)
- Power off miner and the Router(Controler) we send to you.
- take out the ethernet cord(which has connected the Router(Controler) we send to you to your home router for miner configuration in step4).
- Power on the Router(Controler) we send to you.
- Power on the miner.
- just wait for about 5~10 minutes and the mining will start automaticly via wifi.
- Influenced by the network situation, the mining may be interrupted. When this happened, don't be worry, just wait for the miner connect to the network automaticly and mining again. (This may take 5~15 minutes.)
{Miner Configuration}
- This miner is designed as mining via wifi, so the following instructions is for wifi mining. However, mining via WAN is also supported.
- The configuration for the miner is quite like the configuration of the 180GH/s AntMiner, so if you know the configuraion of the AntMiner, you can safely ignore the following instructions and configure the miner just like the AntMiner.
The following are the configuration instruction of the miner:
- connect the Router(Controler) we send to you to your home router by a ethernet cord.
- set the ip of your computer to "192.168.0.xxx", for example: "192.168.0.101". (set it in the "Network Setting" of the computer.)

- Login the configuration page: Open IE --> input "192.168.0.100". The default account is "root", the default password is "root" too. The click "Login" at the bottom right corner.

- Change the time zone to your country.

- There is nothing in the wireless section of the initial interface

- Scan the wifi: click tab "Network" --> "wifi" --> "Scan"

- Select your wifi and join it.

- Configure your wifi

- After wifi configured, the network interface and the initial interface should be like this(if the RX Rate and TX Rate are not empty, then the wifi configuration is success):


- configure the mining pool and worker in the "cgminer configuration" section.

- when mining, you can see the mining status in the "cgminer status" section.

- ok, configuration compeleted.
{TROUBLE LIST}
Q: The miner is working great however when the pool changes to a new block, I am not able to connect until I restart the TPLINK. What can i do ?
A: It must be the setting of "location and timer" caused this problem. Here is one of our custom found out:
"My location and time in the real world is Australia (GMT+09:30). The OpenWRT control was set to Asia thus making the Date / time incorrect within the hardware. When my Miner asked to be connected to a new block the connection (Socket) was refused. This was causing all of my issues and the Server at the Pool end was denying my connection. After setting my location to Australia and putting in the Australian NTP settings my miner has been working great. The following picture showing how to change the time zone: "

Comments
Post a Comment