【Tutorial & Setting up】 1TH/s BTC Miner 28nm 1000GH/s Bitcoin Miner Super ASIC Miner for Bitcoin Mining

- This blog had moved to our official site: WWW.EASTSHORE.XYZ
{Important Note}
- We pack all the miners very carefully, but cords inside the miner might fall out during the delivery. So, if the miner cannot start normally, please just open the case and check if all the cords inside the miner are properly connected.(see section {Trouble List} at the end of this tutorial for the cords need to connect tightly)
- Please pay attention to the heat dissipation. In our test, when the heat dissipation is great, the speed can upto 1.1~1.15TH/s, however, when the heat dissipation is bad, the speed may down to 700GH/s ... For how to make the miner more cooler, see section {Heat Dissipation} beblow.
{Before Start}
- Connect the miner to the router by internet cord.
- The default IP of the miner is “192.168.1.xx”, so, plz make sure the IP your router is "192.168.1.xx" too(eg. 192.168.1.1).
- For miner configuration, plz use the ethernet cord to connect the miner to the same router which your PC also connected. (Your PC is just needed for miner configuration)
- We pack the products very carefully, but cords inside the miner might fall out during the delivery, so, if the miner cannot start normally, please open the case and check if all the cords inside the miner are properly connected.
- If you have several miners, please make sure put them far away from each other.
{Check Your Network}
- Pressing the windows key + the R key. So 'Windows + R'. This should give you a small window called 'run'.
- Enter 'cmd' in the window, and hit the enter key. This should open a new window.

- Input commend "ipconfig", it will show the details of your network.
- Make sure the "Default Gateway" is "192.168.1.xx".

- If the default gateway is not "192.168.1.xx", please change to another router (which give a default gateway as "192.168.1.xx"), or, change the ip of your router to "192.168.1.xx"
- The simplest way is to change the ip of your router to 1922.168.1.1
{MINING GUIDE}
- Connect the miner to the router by internet cord.
- Check out the default IP of the miner. Abount the default IP of the miner, plz see the section {Default IP} below.
- Power on the miner.
- Wait for about 1~3 minutes, until the LED light inside the box stop flashing.
- Open configuration page: Open IE --> input the default IP in the address bar. (eg. the default ip of the miner is “105”, then input “192.168.1.105”. plz make sure the IP of your router is “192.168.1.xx” too.).
- If IE can’t open the address you inputed, plz just try a few more times. (sometimes, the miner need about 10~30s to connect itself to the router)

- Click "english" to change the language to English.
- Set the Network. After you changed the network setting, please: click button "Set network" , then wait for a minute and power off the miner, then power on the miner again. The network setting then will be valid.(Important: 1> if the original network works very well, we don't recommend to change it. If you are not 100% know what the network setting option means, please don't change it. 2> If you changed the IP Address of the miner, then after you saved the changes, you should login the configuration page the new IP you changed.)

- If the default DNS doesn't work for you, you can change it to "8.8.8.8".
- Set the mining worker details. See section {Configuration Page} for how to change the mining worker details.
- Save the change(How to save the changes, see section {Save the pool address and mining_worker} below) and then power off the miner.
- power on again.
- just wait for about 1~5 minute, and the mining will start automatically.
- You can see the mining status on the configuration page or on the LED dispaly of the miner.
- If the speed showing not normal(eg. very low) on the configuration page, plz don't worry, just power off the miner and power on it again.
- For other cnsiderations, plz see sectin {Other Considerations} below.
{Default IP}
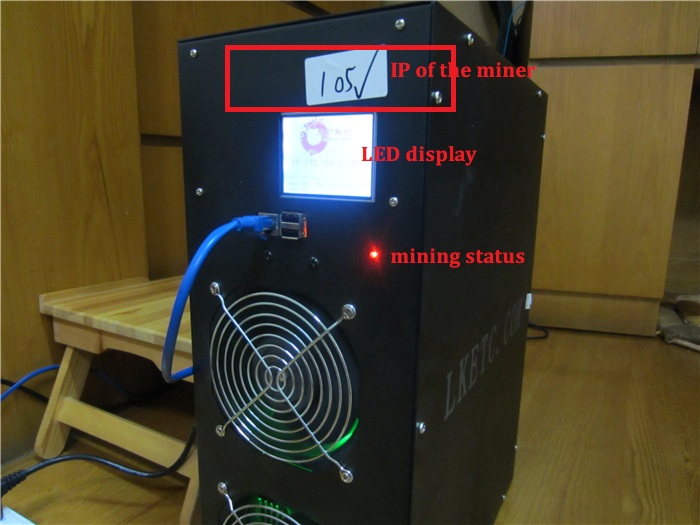
As the picture showing, the “xx” of this miner is “105”, so the default IP address of the miner is: “192.168.1.105”.
But sometimes, the factory may change the ip of the miner(However, this situation occurs only occasionally). So you may can not connect to the miner use the default ip, in that case, plz just download the software “Advanced IP Scanner” to scan the ip. (download here: http://www.advanced-ip-scanner.com/)
{How to use the ip scanning software}
- Download the ip scan software: http://www.advanced-ip-scanner.com/
- Make sure your network, including ip of your router, your PC, all all in the ip section 192.168.1.xx
- Connect the miner to the router via ethernet cord.
- Power on the miner, and wait for about 1~3 minutes (the miner need time to connect itself to the router).
- Open the ip scanning software, set the scan range as "192.168.1.1 - 192.168.1.254".
- Click button "Scan".
- Then you can find out the ip of the miner.
- The following picture showing a scanning result of a miner. The ip of this miner is "192.168.1.246" . There is no this device (at "192.168.1.246") before I connect my miner to my network and it's name is "RASPBERRYPI".
- You can also try every ip if you are not very sure which ip is the miner.
- If you cann't scan out the ip, that's must because the ip of the miner has occupied by other devices in your network, plz try to pull out other devices from your network and try again.
 |
| Scan Result |
{Configuration Page}
The following picture showing the configuration page:

Option Details:
- Setting the network: If you changed the network setting, plz click button “setting the network” to save it. (This button only saves "Network Settings")
- Pool 3: if the pool address is empty, just set it as “/” as the pool 3 blank showing. “/” is the default invalid setting.
- Mining difficulty setting: different mining difficulty setting will get different speed in the pool, the default value is “128”.
- Start option: Saves the "Pool setting" and "miner worker" etc.. see section {Save the pool address and mining_worker} below.
- miner status: the green character indicates that the miner is mining well.
- mining detail: click this one to see the details of the miner.
{Save the pool address and mining_worker}
Set and save the pool address and miner and password:
- Change the pool address and miner and password etc. to your.
- Click the button 1> in Start Option.
- Click the button <2> in Start Option.
- Then the changes were saved.
- Power off the miner.
- Power on again, and the mining will start soon.
{Mining Difficulty Setting & Speed}
Different mining difficulty setting in the miner will get different speed and mining efficiency in the pool. In our case, the default difficulty setting value “128” will get a speed of 910 GH/s ~ 990 GH/s in the pool.

Please do some research abount the relation of difficulty setting and the minging efficiency; And choose a better value for your miner. see also here: https://bitcointalk.org/index.php?topic=274023.0
(PS: for miner test reason, we run all the miners (include 1TH miner, antminer, garden asic and so on.) on the Btcguild.com with the same mining account for a very long time (from 2013 to now), the btc showing here is the btc got by all the miners(from 2013 to the time when we made screen shot), NOT btc got only by the 1TH miner. The shares showing here is also all the miners made from 2013 to when we made the screenshot. The screenshot just for the speed test showing, NOT for any other purpose, and NOT as a guarantee that the btc or the shares(or anything else) you will get by this miner)
{Other Considerations}
- Mining will start automatically in 1 minute after the miner power on.
- Sometimes, the display of the speed may not normal, plz just restart the miner and the display will be ok. Like the following picture showing:
 |
| Not display normal speed |
 |
| Normal Speed (after restarted) |
{Fireware Upgrade}
Let's start upgrade the firmware:
- Download the firmware here: http://pan.baidu.com/s/1sjnsjtb
- And the software for firmware upgrad Win32DiskImager here: http://sourceforge.net/projects/win32diskimager/
- Take out the SD card in the Raspberry Pi (Raspberry Pi is in the box) and insert it to a SD card reader. The below picture showing where is the SD card:

- Insert the SD card reader (with SD card) to the USB port of your computer.
- And then upgrade the SD card to the firmware you have downloaded:

After you upgrade the system, the ip of the miner will be "192.168.1.122". If you cann't connect to miner via this ip, plz download a ip scanning software to get the ip of the new system. (see section {Default IP} for how to use the ip scanning software)
{Heat Dissipation}
Please pay attention to the heat dissipation.
In our test, when the heat dissipation is great, the speed can upto 1.1~1.2TH/s, however, when the heat dissipation is bad, the speed may down to 700GH/s ...
So, to make the miner cooler, you can:
- If you several miners, please make sure put them far away from each other.
- Open the box(and keep it opening) to make the blade inside the miner to get cooler.
- Add more cooling device. For example, you can get some more fan to blow the blade after you open the box. Or, put another fan on the tail of the miner to form a air way. (but please be careful with the orientation of the fan in the tail)
- Get another more powerful fan to replace the original fan.
- We don’t recommend you to replace the original fan of the miner to other fan. Yes, the original fan maybe a little noise, but it bring the miner a bigger air flow.
{TROUBLE LIST}
We are very sorry for the trouble you got, the miner industry is a new industry, so the products are not so perfect sometimes.
Please try following suggestions if you get any troubles:
- Is the heat dissipation of the miner normal ? Because the miner maybe stop mining(or speed low) if the temperature is too high. So, please:
- If you several miners, please make sure put them far away from each other.
- Open the box(and keep it opening) to make the blade inside the miner to get cooler.
- Add more cooling device. For example, you can get some more fan to blow the blade after you open the box. Or, put another fan on the tail of the miner to form a air way. (but please be careful with the orientation of the fan in the tail)
- We don’t recommend you to replace the original fan of the miner to other fan. Yes, the original fan maybe a little noise, but it bring the miner a bigger air flow.
- Make sure all the cords inside the miner are connected tightly.
 |
| Overview |
- Check below cords, see if they are connected tightly.


- Check the cords on the pi. Plug them tightly.
- Configuration all correct ? plz try to reconfigure the miner.
- Change a mining pool.
- Check the network settings, especially the setting of router and DNS. If the DNS setting is not correct, then the miner cannot recognize it, which leads to failure of connection to pool. Is the miner directly connected to the router? Has any device occupied the IP of the miner? Try DNS 8.8.8.8 if the default DNS doesn't work well.
- Check the PSU cord and signal cord in the box. Open the box, there should be some modules inside as shown in the picture attached. Check every module see if any of the PSU cord or signal cord (especially signal cord) got loosed up during delivery. Plug tightly every cord.

- Check if the screws on the cooling panel(the sliver part in the picture) are tight

- Check the cords on the main control panel (as in the following picture showing) and make sure they are plugged tightly. And there are about 6 connect socket for data transfer of each blade (the bottom part of picture), try to change to another socket to plug.

- Check the modules in the box. Take out the power cords and signal cords of 3 of the modules, and see if the left one works normally. Do that to every module to check if every module is working well, is it one of the module is not working normally. It might be problem of the sync-starting of the 4 modules.
- Switch the cords of one of the working modules and the cords of the not-working module, see if it's the cords that caused the problem.
- Swith the position of the working modules and not-working module.
- Subsititue the mining system in the SD card, download the OS here (back up the current system just in case). See section {firmware upgrade} for how to subsititue the mining system.
After changing the settings of the miner, power off it. Then power on, wait a while, and log on to check the mining status.
My ip is 192.168.2.xx please help me I cant get access :(
ReplyDeleteMy ip is 192.168.2.xx please help me I cant get access :(
ReplyDelete