{UPDATE}
- This blog had moved to our official site: WWW.EASTSHORE.XYZ
Here is the common tutorial in the mining world.
{Setting Up the PSU}
Suppose you use a ATX Computer Power Supply as your mining PSU.
You will need 1 jumper wire. On the PSU’s 24pin motherboard power cable, you have to cross the “Green” line and the “Black” line.
(The PSU has a computer inside and it communicates with the motherboard. For this setup, there is no computer motherboard to connect to, so, we have to make the PSU think it’s connected to the motherboard and the PCI and PCI-Express ports are needing the +12 V power.
(The PSU has a computer inside and it communicates with the motherboard. For this setup, there is no computer motherboard to connect to, so, we have to make the PSU think it’s connected to the motherboard and the PCI and PCI-Express ports are needing the +12 V power.

{Selecting the +12V lines from the PSU}
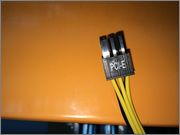
The “yellow” line of the 6pin is the +12V lines. So, a 6pin connector affords 3 +12V lines. For some miners, like Garden 8GH blade miner, a 6pin connector can get 3 blades mining together(But plz make sure the DC of the +12V is powerful for mining, eg. 12V DC > 15A).

{Connect PSU to your miner}
How to connect your PSU to your miner?
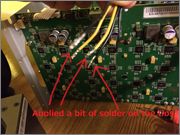
- Cut the 6pin: For Garden 8GH blade ASIC miner, you need to cut the 6pin cables and get the yellow line(+12V) of the 6pin and the yellow(or red) line of the cord seed to you together.
- Connect 6pin to miner directly: for some miner, like 38GH BOX miner, new generation AntMiner and so on, you just need connect the 6pin to the port on the miner directly, do not need to cut the 6pin itself.
An 8 pin 12 volt cable has yellow wires on the same side as the connector clip. An 8 Pin PCI Express cable has black wires on the clip side.
Comments
Post a Comment