
{UPDATE}
- This blog had moved to our official site: WWW.EASTSHORE.XYZ
Official Firmware Update: https://github.com/AntMiner/AntGen1/tree/master/firmware
Over Clocking to 200GH/S (May void warranty) - Please Scroll Down!
{Antminer Manual}
- Please download the AntMiner user manual for reference: https://drive.google.com/file/d/0B-_jcpU1s5dgaW0tdF9ybE0xTUU/edit?usp=sharing
{Tutorial Start}
- This is how you'll receive your AntMiner S1 180 GH/S miner.


{Power Supply}
- You must power up the miner. To set up your power source for the AntMiner, the miner will use average 360W at the wall outlet. So at least 400W computer PSU is needed. (550W PSU with 80 PLUS is recommended for the stable operation, please make sure the 12V DC of the power is up to 45A) , and the PSU has a 6pin*2 connector;
- For this guide, we selected to use SUPER FLOWER SF-550P14XE 550W ATX 80PLUS GOLD power supply(check it out: http://www.aliexpress.com/store/product/BTC-miner-550W-12V45A-80PLUS-GOLD-Power-Supply/1035615_1634977122.html); The specification of this PUS is:

- Important!!! Please do get QUALITY and STRONG enough power supply for them. We have read about that if the PSU is not strong enough, the miner might shut down.
- IMPORTANT!!! You will need 1 jumper wire. On the PSU’s 24pin motherboard power cable, you have to cross the “Green” line and the “Black” line. (The PSU has a computer inside and it communicates with the motherboard. For this setup, there is no computer motherboard to connect to, so, we have to make the PSU think it’s connected to the motherboard and the PCI and PCI-Express ports are needing the +12 V power.


- It is very easy to connect the miner and the PUS now, lets's just connect the 6pin of the PSU to the miner.(the miner need 2 6pin cords for power supply, so your PSU should get 2 6pin cords)
- You can use the 6pin connector or the 6pin+2 connector:
- connect like this:

- You just need to insert the 2 6pin cord to the miner.
- Let's Find Out Your Home Internet Setting

- [Windows] While your computer is connected to the Internet, go to the Command Prompt and type "ipconfig" then press "ENTER" Key. This will give you the network information you'll need later. Please write it down!
- Power On the AntMiner & Connect the AntMiner to your Computer


- By using the regular Ethernet network cable, directly connect the AntMiner and your computer.
- When you turn on the AntMiner the first time, the fun is off, and you'll see 3 LED lights turn on connected to the Control Board with the Ethernet Port. A red and green LED turn on under the white-colored cables on top of the AntMiner. The 3rd light is the green LED for the Ethernet Port. It's very quiet at this point.


- If you are using the Microsoft Windows 7, here is the step by step process to configure your AntMiner.
- Start Button >> Control Panel >> Network and Internet (View network status and tasks) >> Change adapter setting (Left side of the screen) >> Local Area Connection (Double Click) >> Internet Protocol Version 4 (TCP/IPv4) then Click on “Properties” >> Select Use the following IP address:
- Please look at near the cooling fan on the AntMiner. You’ll find a white sticker with an IP address printed on it. (Example: 192.168.2.125)
- Set your computer's IP address to the following:
- IP Address: 192.168.2.254
- Subnet: 255.255.255.0
- Default Gateway: 192.168.2.1
- For the DNS Setting: Select “Obtain DNS server address automatically


- Open a web browser and type the IP address printed on the sticker above the cooling fan on the AntMiner. (Example: 192.168.2.102)
- A login page will appear on the webpage and ask you for the username and the password. (Default Username: root Default Password: root)
- After log into the control panel, please go to the Status Tab then “Miner Configuration” tab.
- Here, please fill out your mining pool information.
- Example: Pool 1
- Pool1 worker: worker’s name from your mining pool account
- Pool1 password: worker’s password from your mining pool account
- If you have multiple pools you want to mine, you can add pool 2 and pool3

- By DEFAULT, it should be already set as "DHCP Client" mode, but if it wasn't for some reasons, please change it like the above picture. Then hit "Switch protocol" button, wait for the screen to refresh, then hit "Save & Apply" at the bottom. Wait till the update completes. (Updating may take 1 - 2 minutes. If it hangs, try again)
Change IP address of the AntMiner [Option]


*** If you decide to change the AntMiner's IP address, Please Write It Down & DO NOT FORGET it. If you forget the IP address, you will not be able to access AntMiner again. ***
- If your home/office network uses the home/office Internet Router (Wi-Fi included) with the common or the default setting, more than likely your network IP setting will be 192.168.1.XXX. For this example, let's assume your Internet Router (Wi-Fi Router's) setting as follow:
- If you don't know the Internet Router's IP setting, and you are using the Microsoft Windows, please go to the command prompt and type "ipconfig". It will show you the computer's IP address, Current Subnet Mask and Default Gateway. (Please see the above photo)
- DHCP: Enabled
- Gateway: 192.168.1.1
- Computer’s IP: 192.168.1.105
- Subnet Mask: 255.255.255.0
- DNS: blank ( or 192.168.1.1)
- You want your miner's IP address to be 192.168.1.XXX (any number up to 255 that is not taken yet. 192.168.1.254 could be a safe one to use)
- Once connected, Go to Network Tab, then select WAN
- Protocol: Static Address
- IP4: 192.168.1.254
- IPv4 netmask: 255.255.255.0
- IPv4 Gateway: 192.168.1.1
- IPv4 Broadcast: blank
- Use custom DNS servers: blank or 8.8.8.8
- Then click on Save & Apply. Please wait for 1-2 minutes to be updated.
- Unplug the Ethernet cable from your computer and connect it to the Internet Router ( or Wi-Fi Router's Ethernet Port)
- You'll see small green-colored LEDs start flashing on both sides of the miner in about 1-2 minutes.
Own Network Setup Just for the AntMiner (Optional)
- If you want to keep the AntMiner's default network setting as is, while you mine bitcoin, you can set up another Internet Router.
- Example: The AntMiner's Sticker said, "192.168.2.125", set up another Internet Router / Wi-Fi Router to the following setting:
- Default Gateway: 192.168.2.1
- Subnet Mask: 255.255.255.0
- DHCP: Enabled
- Once the new Internet Router is configured for the IP address in the range of 192.168.2.XXX, connect the Ethernet Cable from the AntMiner to the Internet Router!
- Wait for 1-2 minutes, and you'll see the green-colored LEDs start flashing on both side of the miner and that indicated the mining operation is in progress!
AntMiner Alternate Wi-Fi Mining


- Even though the AntMiner supports built-in Wi-Fi mining, to get the best out of the miner while running Wi-Fi at home, here is an easy solution for you and we tested it for over 24-hours and so far it’s working.
- You can use any similar items to make it work. We picked the readily available item at the US BestBuy Store.
- If you happen to be living in a dorm, apartment or wherever you can only access the internet via Wi-Fi, this will make the Antminer believe it’s connected to the wired Ethernet and this will not stress the miner.
- Bandwidth used during the last 24-hours or more like 36 hours happened to be RX: 38.86 MB (161800 Pkts.) & TX: 14.68 MB (105524 Pkts.)
- We purchased the above item to test it out with the AntMiner and it worked!
{TROUBLE SHOOT}
1. It hangs at "Updating Cgminer"
- Please go to your control panel, Status >> System Log
- If you see the following error or something similar, Your DNS server is not resolving the address or connection to the following servers are restricted/filtered by your ISP or County's Restrictions
Fri Sep 27 15:39:40 2013 daemon.info sysinit: ntpd: bad address '3.openwrt.pool.ntp.org'
Fri Sep 27 15:39:40 2013 daemon.info sysinit: ntpd: could not resolve peer 3.openwrt.pool.ntp.org, skipping
Fri Sep 27 15:40:10 2013 daemon.info sysinit: ntpd: bad address '2.openwrt.pool.ntp.org'
Fri Sep 27 15:40:10 2013 daemon.info sysinit: ntpd: could not resolve peer 2.openwrt.pool.ntp.org, skipping
Fri Sep 27 15:40:40 2013 daemon.info sysinit: ntpd: bad address '1.openwrt.pool.ntp.org'
Fri Sep 27 15:40:40 2013 daemon.info sysinit: ntpd: could not resolve peer 1.openwrt.pool.ntp.org, skipping
Fri Sep 27 15:41:10 2013 daemon.info sysinit: ntpd: bad address '0.openwrt.pool.ntp.org'
Fri Sep 27 15:41:10 2013 daemon.info sysinit: ntpd: could not resolve peer 0.openwrt.pool.ntp.org, skipping
2. Clicking Noise from the AntMiner
3. AntMiner Keeps Shutting Down
AntMiner could be powered on for 50 minutes before it shuts itself down. OR It could be powered on for about 30 seconds then it shuts down. Your problem is more than likely in the PSU.
4. My +12V Molex/IDE/SATA Powerline is getting very Hot
If you used the +12V line from the Molex/IDE/SATA Power Cable and the AntMiner powered on, but, the power cables are getting very hot and Miner is under performing, PLEASE DISCONTINUE using the Molex's +12V line. The 4-pin Molex or so-called SATA/IDE power cable has 1 +12V line (Yellow), however, this line's maximum current is usually 5 Amps and 60W. That is not enough to support each Blade that requires about 180W to run smooth 90GH/S hashing. Yes, it is the yellow-colored line, but the power specification is different from the PCI or PCI-E Power Cables.
5. My PSU's cables are not color-coded, I don't know what to do!
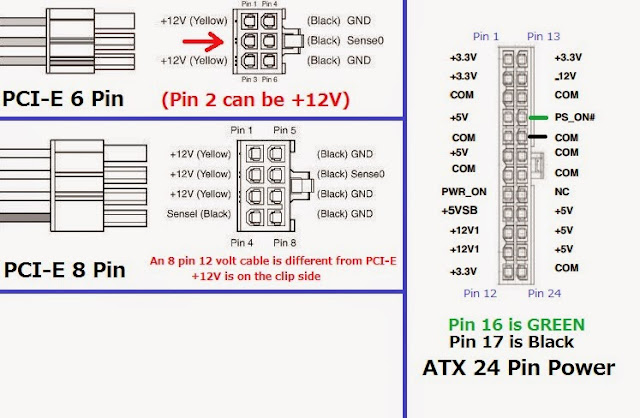
Please look at the above photo. It will show you the pinout information. There are several different shapes of connectors and power specifications. Please pay Special Attention to the 8-Pin Power Connectors. There are 2 kinds of 8-Pin Connectors. WARNING: An 8 pin 12-volt cable has yellow wires on the same side as the connector clip. An 8 Pin PCI Express cable has black wires on the clip side. (See Above Pinout Diagram)
6. I see "x" in the ASIC Status
7. My AntMiner arrived with no IP address sticker
Also, this applies for the lost IP or possible wrong IP on the sticker, using this soft wear will tell you what AntMiner's IP is! (Thanks to JohnC. for the URL)
Using this IP Scanner would save you a lot of time searching for your Antminer.
http://www.advanced-ip-scanner.com/
8. My Mining Pool Speed is slower than 180GH
Please check your AntMiner's Mining Status Page. If the status showed 168-180, your miner is working as it should. The mining pool speed calculation is based on what you transmit to the pool after the hashing. It is normal to see the mining pool GH/s speed fluctuate and sometimes it may show significant lower hashing speed. Please check your network condition and maintain a stable internet connection. On my miner, I have seen 120GH/s speed at BTCGUILD when my Internet connection was cutting in-out for a short period of time due to the ISP problems.
9. How do I Upgrade my Firmware?
If your AntMiner's PCB shows 2013/11/4, you can upgrade to the current firmware to reduce high HW Errors and fixes ASIC Chip Status Errors and others.
How to overclock your miner to 400MHz / 205GH/s
The miner will draw 500 - 525Watts after this setting
Fri Sep 27 15:40:10 2013 daemon.info sysinit: ntpd: bad address '2.openwrt.pool.ntp.org'
Fri Sep 27 15:40:10 2013 daemon.info sysinit: ntpd: could not resolve peer 2.openwrt.pool.ntp.org, skipping
Fri Sep 27 15:40:40 2013 daemon.info sysinit: ntpd: bad address '1.openwrt.pool.ntp.org'
Fri Sep 27 15:40:40 2013 daemon.info sysinit: ntpd: could not resolve peer 1.openwrt.pool.ntp.org, skipping
Fri Sep 27 15:41:10 2013 daemon.info sysinit: ntpd: bad address '0.openwrt.pool.ntp.org'
Fri Sep 27 15:41:10 2013 daemon.info sysinit: ntpd: could not resolve peer 0.openwrt.pool.ntp.org, skipping
- Here is the list of IP Addresses to the NTP Servers
- 198.58.100.237
- 209.118.204.201
- 199.195.193.200
- 189.211.62.210
2. Clicking Noise from the AntMiner
- If your AntMiner was making many rapid clicking noise from the PCB, that means you lost the Internet Connection to the AntMiner.
- You can shut the AntMiner down while you wait for the Internet Connections to come back or you can just leave the AntMiner as is. When the internet connection came back, it will start mining on it's own. (So if you lose the internet connection for whatever the reasons, as soon as the internet connection comes back, it will auto mine BTC without any intervention)
- When the miner loses the internet connection, the miner status page seems to reset the time counter (timer) but no negative effect to the mining operation.
- There are two (2) ways to tell if your miner lost the internet connection. First, you’ll hear the clicking noise from your miner. (Also the 2 small green led lights on both sides of the miner will stop flashing.) The second way is go to the miner status page and the running timer (Elapsed) will reset and start from “0”.
- Here is the video to show what the minder does, when the internet connection was disrupted. It makes constant clicking noise, and the green LED on the PCB (Main PCBs for the ASIC Chips) will turn off and the fan would turn off. When the miner regains the internet connection, the clicking noise goes away and about 30 seconds or so later, the green LEDs will start flashing again. (These Green LEDs indicate the miner is actually hashing) Then, the fan will starts. When you go log onto the miner's control panel, the time counter on the miner's status page will be reset: http://youtu.be/3qNxES1mnZc


3. AntMiner Keeps Shutting Down
AntMiner could be powered on for 50 minutes before it shuts itself down. OR It could be powered on for about 30 seconds then it shuts down. Your problem is more than likely in the PSU.
- Please check the jumper cable to make sure the PIN16 (Green) and PIN17(Black) are crossed. (Make sure you are not using the thin loose wire or paperclip for this)
- If the Jumper Cable is jammed in and set correctly, it could be your power supply unit. I understand that you could be using the 550W or even 750W PSU but it may not be strong enough to do the job. To check the PSU, run your AntMiner in 1 Blade Mode.
- Disconnect all the power cables from the 2nd Blade. (1st Blade is the Network Cable Port Side) Disconnect the white plug on the top from the 2nd Blade. Then Power On the AntMiner. If the problem was in your PSU, AntMiner will power on and it will start mining at about 90GH/S.
- If you really want to test out the 2nd Blade, then replace the 1st Blade with the 2nd Blade. (By the network cable port, there are 2 white plugs. Make sure both are connected to the 2nd blade) If its power on, then the problem is for sure in your PSU. Please go get a brand name reliable PSU.
- If you have an extra CD/DVD drive laying around, try plugging it into the Molex power cable to create the base load on 5V line. Depends on your PSU Model, it may fix your looped auto-shutoff (http://reprap.org/wiki/PCPowerSupply#Base_Load )
4. My +12V Molex/IDE/SATA Powerline is getting very Hot
If you used the +12V line from the Molex/IDE/SATA Power Cable and the AntMiner powered on, but, the power cables are getting very hot and Miner is under performing, PLEASE DISCONTINUE using the Molex's +12V line. The 4-pin Molex or so-called SATA/IDE power cable has 1 +12V line (Yellow), however, this line's maximum current is usually 5 Amps and 60W. That is not enough to support each Blade that requires about 180W to run smooth 90GH/S hashing. Yes, it is the yellow-colored line, but the power specification is different from the PCI or PCI-E Power Cables.
- Usually, +12V from the Molex power cable will not let you power up the AntMiner, but there are instances that the miner will power on. (NOT RECOMMENDED!!)
5. My PSU's cables are not color-coded, I don't know what to do!

Please look at the above photo. It will show you the pinout information. There are several different shapes of connectors and power specifications. Please pay Special Attention to the 8-Pin Power Connectors. There are 2 kinds of 8-Pin Connectors. WARNING: An 8 pin 12-volt cable has yellow wires on the same side as the connector clip. An 8 Pin PCI Express cable has black wires on the clip side. (See Above Pinout Diagram)
6. I see "x" in the ASIC Status
- For the ASIC status wise, "x" doesn't necessary means the chip is faulty or failing. If the hashing power seems to be affected, please check your PSU and wiring and reboot and check the status a few times. It should go back to an average 168-180 GH/s range per AntMiner.
- when you are getting "x" on the ASIC chip status, please turn off the antminer and double check your PSU cables are connected well and restart. Check the status in about 5 minutes and every 30 minutes for a few hours and see if the "x" are showing up constantly at the same chip or randomly changes or completely disappear.
Also, this applies for the lost IP or possible wrong IP on the sticker, using this soft wear will tell you what AntMiner's IP is! (Thanks to JohnC. for the URL)
Using this IP Scanner would save you a lot of time searching for your Antminer.
http://www.advanced-ip-scanner.com/
8. My Mining Pool Speed is slower than 180GH
Please check your AntMiner's Mining Status Page. If the status showed 168-180, your miner is working as it should. The mining pool speed calculation is based on what you transmit to the pool after the hashing. It is normal to see the mining pool GH/s speed fluctuate and sometimes it may show significant lower hashing speed. Please check your network condition and maintain a stable internet connection. On my miner, I have seen 120GH/s speed at BTCGUILD when my Internet connection was cutting in-out for a short period of time due to the ISP problems.
9. How do I Upgrade my Firmware?

If your AntMiner's PCB shows 2013/11/4, you can upgrade to the current firmware to reduce high HW Errors and fixes ASIC Chip Status Errors and others.
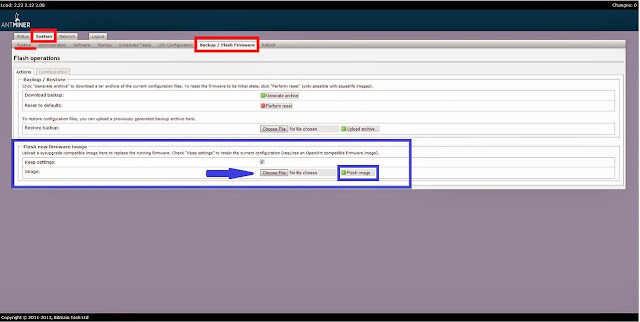
- Login to your control panel, then please go to System >> Backup/Flash Firmware
- From there, please use "Flash new firmware image" and click "Choose File" then Click "Flash Image"
- Download: antMiner_openwrt20131129.bin
- MD5: 5f55b54629df5880bc9dab8e1ea8781d
- SHA1: 92effbad610c3e490a60cb2b1cd05cab4921f34f
{OVERCLOCKING ANTMINER}
This may void your manufacture's warranty! This will work but please use extreme caution!! This is for someone who's primary goal of operating AntMiner is to maximize profit over the system stability.How to overclock your miner to 400MHz / 205GH/s
The miner will draw 500 - 525Watts after this setting
- ssh into your miner
- edit the following file: /etc/config/asic-freq
- change timeout to 36, freq_value to '0780', 'chip_freq' to 400.
Code:
root@antMiner2:/etc/config# vim asic-freq
package 'cgminer'
config 'asic-freq' 'default'
#option 'freq_value' '0780' #400M
#option 'freq_value' '4d81' #350M
#option 'chip_freq' '350'
option 'timeout' '36'
#option 'freq_value' '4c81' #325M
#option 'chip_freq' '325'
option 'freq_value' '0780' #350M
option 'chip_freq' '400'
#option 'freq_value' '0580' #300M
#option 'chip_freq' '300'
#option 'freq_value' '0981' #250M
#option 'chip_freq' '250'
#option 'freq_value' '4f02' #190M
#option 'chip_freq' '190'
Thanks to share this post.bitmain antminer is a very good product.
ReplyDeleteThanks to share this post.antminer s19 pro price is a very good product.
ReplyDelete